Tuesday, March 31, 2015

Sew Your Pattern Stash ~ Sisboom Jamie Dress

Sew Your (Pattern) Stash 2015
 
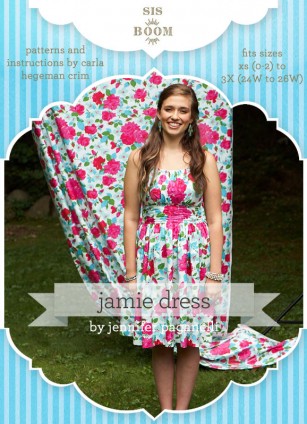
March's theme for Sew Your Pattern Stash has been Dresses and Skirts.  I was hoping to make a Sisboom Angie, Sisboom Jamie and Ellie Inspired Spring Lily, but work and illness have kept me away from the sewing machine.  I was able to make a Jamie dress this week and am very happy with the result.
 
This Jamie took about 6 hours from cutting to sewing.  It was a simple dress and would be suitable for a beginner with some experience.  It does have a size zipper and fully lined bodice.  The lining is treated as one piece with the outer fabric during construction, so it does not really add to the complexity of the project.  This makes the inner dress not as neat as more traditional construction but much faster to sew. 
 
I chose a knee length skirt and added a lining layer since my gingham was very thin.  I'd love to try a circle skirt next time to decrease the bulk at my waistline.  I love the vintage-vibe of the gingham print, close-fitting bodice and full skirt.  I'm looking forward to more Jamies in my wardrobe!

 
My girls have fun designing on the extra dress form a friend gave me.  Check out their latest design!


Friday, February 20, 2015

Self-care sewing

Things have been quiet on the blog!  I have made some time for selfish ( self-care) sewing in the past month.  I am also continuing to work on the Wardrobe Architect from the Colleterie.

My first sew was the Jocole Skinnies Pants.  I've had this pattern but have been afraid to try skinnies because of my size.  I used my hip measurement and the fit was good. I need to raise the outer hip curve next time but otherwise, fit was spot on.  I used stretch denim from the Fashion Fabrics Club and a lycra blend for the waist. I actually feel good wearing them!

I have also been sewing a pajama set that is still in testing. The first pair was with stretch lace and Terry cloth - so comfy! There were some adjustments before making the striped knit pair. This will also have a matching kids pattern. Look for it to be released next week from 5 out of 4 patterns.


Saturday, February 7, 2015

Dr. Seuss Hat Tutorial ~ Cat in the Hat

One of my most popular posts has been the Dr. Seuss Hat Tutorial.  This was a hat I made to wear at my kids school on Read Across America Day back in March 2010.  I updated the document links for the pattern pieces.  This hat sews up in about an hour, so grab that felt, fabric and sew one for your little reader. 
~~~~~~~~~~~~~~~~~~~~~~~~~~~~~~~~~~~~~~~~~~~~~~~~~~~~~~~~~~~~~~~~~~~~~~~~~~~
My kids are excited for Dr. Seuss' birthday and Read Across America Day, March 2.  Their school is providing green eggs & ham for breakfast and inviting families to come participate in reading programs that day.  They have been encouraged to dress like their favorite Dr. Seuss character, so Drew decided he wanted a Cat in the Hat striped hat.  Here's the picture I used for my replica:
 

Mama Lusco's Dr. Seuss Hat Tutorial/Pattern
fits most elementary age - small adult heads
 
 
Supplies:
1/2 yd red felt
1/2 yd white felt
1/2 yd  lining fabric ( I used part of a pillowcase)
Sewing notions inclucing: Sewing machine, Thread (red recommended), Scissors, Pins, Rotary cutter & mat (recommended)
Pattern pieces for hat top and hat brim:
Dr. Seuss Hat Top
Dr. Seuss Hat Brim
Please add 1/4" seam allowance around pattern pieces

1.  Cut pieces for hat body:  Cut 3 - 3"w x 22"l from Red Felt
                                           Cut 2 - 3"w x 22"l from White Felt
     (Cut lining fabric after above pieces sewn together to form hat body)

2. Starting with a strip of red felt, sew with right sides together alternating between red & white strips.

3.  Place hat body onto lining fabric as a template and cut out lining.  Baste around all edges, connecting hat body to hat liner.  With right sides of hat together, sew up side seam.  You now have a tube shape for the completed hat body.

4.  Using Hat Top  pattern piece, cut 1 Red Felt and 1 lining fabric.  Baste around edge.


5.  Turn hat body with liner out and pin to hat top with liner up.  Sew around, connecting hat top to hat body.


6.  Cut out Hat Brim pieces: 2 - White Felt.  (see picture above in step 4)
    ( I did not have enough white felt, so I cut 1 piece red and 1 piece white)
    Place right sides together and sew around outside edge.  Turn right-side-out and baste around inside edge.


7.  With hat and brim right-side-together, pin brim to hat and sew around.  


8.  (Optional) Trim seams down to about 1/8" and overcast or serge.


Put on your hat and grab a good book!


Please forgive any errors or omissions in this tutorial.  Email me with questions or suggestions.  Pattern is for personal use only.


Get your craft on Thurs.


Photobucket


oneprettything

Photobucket


Friday, January 9, 2015

Wardrobe Architect 2015- January


Have you heard about the Wardrobe Architect hosted by the Coletterie?  It's a guided program to help define your personal style and develop a hand-made wardrobe that you will love wearing.  They give monthly projects to help organize and put together your wardrobe. Not everything needs to be new or handmade.  Check out January's project list here.

I like the idea of organizing my wardrobe.  I have many pieces that I've made during pattern testing or because the pattern looked great in the listing, only to have them sit in my closet because they don't fit my lifestyle or personal style.  The same goes for my girls closet...I think this challenge would be great for me children's wardrobes, too!

I've recently cut back my hours at work to allow more time at home and sewing!  My goal is to be more intentional in my sewing this year and share more projects here on the blog.  Hope you follow along and consider joining in!