Facebook

Facebook
Follow on Facebook

Follow on Pinterest

About Me

My photo
Believer, Daughter, Wife, Mother, Sister, Aunt, Registered Nurse, Seamstress, Crafter, Housekeeper, Cook, Baker, Gardener, Reader, Keeper of the chickens, Goat Herder, Homesteader, Thrifty, Usually sane, Overworked, Mom of 3. Thanks for stopping by - I appreciate your comments! ~ Angie

Pinterest

Followers

Thursday, February 25, 2010

Dr. Seuss Hat Tutorial

My kids are excited for Dr. Seuss' birthday and Read Across America Day, March 2.  Their school is providing green eggs & ham for breakfast and inviting families to come participate in reading programs that day.  They have been encouraged to dress like their favorite Dr. Seuss character, so Drew decided he wanted a Cat in the Hat striped hat.  Here's the picture I used for my replica:
 

Mama Lusco's Dr. Seuss Hat Tutorial/Pattern
fits most elementary age - small adult heads
 
 
Supplies:
1/2 yd red felt
1/2 yd white felt
1/2 yd  lining fabric ( I used part of a pillowcase)
Sewing notions inclucing: Sewing machine, Thread (red recommended), Scissors, Pins, Rotary cutter & mat (recommended)
Pattern pieces for hat top and hat brim:
Dr. Seuss Hat Top
Dr. Seuss Hat Brim
Please add 1/4" seam allowance around pattern pieces

1.  Cut pieces for hat body:  Cut 3 - 3"w x 22"l from Red Felt
                                           Cut 2 - 3"w x 22"l from White Felt
     (Cut lining fabric after above pieces sewn together to form hat body)

2. Starting with a strip of red felt, sew with right sides together alternating between red & white strips.

3.  Place hat body onto lining fabric as a template and cut out lining.  Baste around all edges, connecting hat body to hat liner.  With right sides of hat together, sew up side seam.  You now have a tube shape for the completed hat body.

4.  Using Hat Top  pattern piece, cut 1 Red Felt and 1 lining fabric.  Baste around edge.


5.  Turn hat body with liner out and pin to hat top with liner up.  Sew around, connecting hat top to hat body.


6.  Cut out Hat Brim pieces: 2 - White Felt.  (see picture above in step 4)
    ( I did not have enough white felt, so I cut 1 piece red and 1 piece white)
    Place right sides together and sew around outside edge.  Turn right-side-out and baste around inside edge.


7.  With hat and brim right-side-together, pin brim to hat and sew around.  


8.  (Optional) Trim seams down to about 1/8" and overcast or serge.


Put on your hat and grab a good book!


Please forgive any errors or omissions in this tutorial.  Email me with questions or suggestions.  Pattern is for personal use only.


Get your craft on Thurs.


Photobucket


oneprettything

Photobucket


Kids Clothing Upcycling Ideas

Wow!  I just read through Disney's ideas -from Ruffles & Stuff- for upcycling your kiddos tops and bottoms into new clothing.  She has some beautiful examples and some techniques I had never thought to try.  Amazing stuff!

Here's a link to the post about making tops wearable longer...
 
Photo from Ruffles & Stuff
And a link to the post about upcycling bottoms... 
 
 
Photos from Ruffles & Stuff

My favorite way to reuse outgrown clothing is making new dresses, hoodies and pants from their old knits.  Ashley at Lil Blue Boo has some great, easy-to-follow patterns showing how to recycle your old t-shirts into great new clothing.  After reading Disney's ideas I'm kicking myself for sending those 4 boxes of outgrown clothes to the thrift shop!

Today I also found this great idea from This Mama Makes Stuff to turn men's slacks into boy trousers.  Perfect for Drew!

I'd love to hear how you upcycle clothing to make it wearable longer.  Pictures, links, and descriptions would be appreciated!

Tuesday, February 23, 2010

Apron Love

Anyone else out there love to wear an apron around the house?  The women in my family have always worn them in the kitchen, so it's always been habit for me.  After taking a womens' class from church I decided to make aprons as gifts for our teachers, who had given us a cooking lesson before the Bible study.  You can also learn how to cook by taking some courses from this site.
They were much appreciated, but I was surprised how other young women in the class did not even own an apron!  They have become vogue again because APRONS ROCK!  I am in need of more full aprons because I'm so messy and found a few great tutorial lists.

http://tipnut.com/56-free-apron-patterns-you-can-make/

These from Modest Maven:
Photo from Modest Maven
Or this Five Ruffle Anniversary Apron from The Secret Stitch Club:
Photo from The Secret Stitch Club

One more adorable ruffled half-apron from One More Moore:
 
Photo from One More Moore

I was lucky enough to win one of Sew, Mama, Sew's giveaways from Becky at Sew In Stitches and love the aprons she made for me & the kids.  Sorry, no picts of these yet, but we sure like them. Thanks again, Becky!

Monday, February 22, 2010

Upcycled Clutch Tutorial

I really like what Linda at Craftaholics Anonymous did with a thrifted suit jacket - a classy little clutch!  Check out the tutorial here.
 
Photo from Craftaholics Anonymous

Sunday, February 21, 2010

Great Giveaway!

I'm a big fan of Today's Giveaway and have even one several giveaways from them.  I'm really liking these Mommy shirts from Demi Bella and would love to win one, since they are pricey!  Check it out at Today's Giveaway.
 
Picture from Demi Bella

Thursday, February 18, 2010

Lil Blue Boo/ Dharma Trading Challenge


Ashley from Lil Blue Boo has posted all 151 entries into her LBB & Dharma Trading Co challenge.  Visit the gallery here to see the amazing entries, including 4 of my own :)

I was so happy that Beatrix from Kindsershop Online found inspiration from my Coral Ruffles dress to make these darling white ruffled dresses for her twins.
 I'm hoping to get my sewing machines and supplies unpacked in the next week so I can get back to sewing.  I plan to make the draperies for the whole house, so I have lots to do!

Friday, February 12, 2010

Instead of Packing...

I should be packing, but instead I'm sitting at the computer wishing I were sewing :)  Some parts of the country are covered in snow, but here in Grant County, OR we're it's beginning to feel like spring.  It's almost time to bring out my spring bags and wanted to share a few bags on my 'To Do' list...

The Ruffled Messenger Bag from Between the Lines.


Photo from Lola...again
And last but not least, the Charm Square Jewel Bag by Mad Quilter

 
Photo from Mad Quilter
 
I'm always looking for great bag patterns big enough for all my mommy gear.  I'd love for you to share some of your favorite bag patterns, too!  Now I'm back to packing....


Wednesday, February 10, 2010

Whimsy Couture Giveaway

Please visit my blogger friend Denise over at Whimsy Couture for a gift certificate giveaway worth $35 to her Etsy shop.  She is one of my favorite PDF pattern makers!

Monday, February 8, 2010

Timeout For Moving

Ahhh....it feels good to sit!  The last 4 days have been crazy busy preparing the new house for the final inspection (we passed!) and getting it painted before moving.  I still have 1/2 the house to paint before moving this weekend and haven't even started to pack.  I won't be blogging much until we get settled in the new place, so I'll be back next week!

Thursday, February 4, 2010

Crochet Hearts

I shared these adorable crochet Tiny Hearts from Julie-K last week.  I was able to use some stashed yarn to hook some up! The pattern was simple, easy to follow, and they turned out perfectly!  I wasn't quite sure what to do with them, but decided to crochet a little headband, then stitched some of the hearts on it.  It's so cute!  The others I have in a little Mason jar in my kitchen.  They make me smile...
For some reason the pic won't rotate - sorry!

Tuesday, February 2, 2010

Pattern Testing -Apron Double Layer Ruffle Skirt

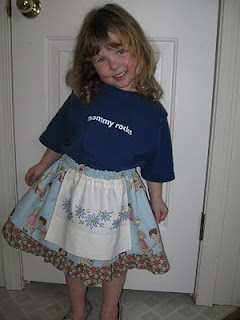
I was lucky enough to test another Whimsy Couture pattern today - the APRON DOUBLE LAYERED RUFFLE SKIRT!
 
Picture from Whimsy Couture
 
This skirt came together beautifully!  The pattern was well-written and the project took about 2 hours.  I was able to use fabrics from my stash and a vintage embroidered sheet for the apron (thanks, Mom, for sharing your wedding present!)  The skirt has a whimsy, vintage feel with the little children fabric and embroidered apron.  Mallory refused to put on a nice shirt and shoes for pictures, but wore the skirt all day!  I'm happy that she's happy!  Watch the Whimsy Couture Etsy Shop for the release of this pattern soon!

giveaways

Reversible Pants DONE!

My last post shared this tutorial from I Make Stuff for reversible valentines pants.  Today I made a pair using my favorite pant pattern from Whimsy Couture and making them reversible as described in the tutorial from I Make Stuff.  They are adorable, but a little big.  I moved the heart pocket to her left leg as a cargo pocket - she's a lefty and loves to stash her treasures!  I was able to use up some more of my stash and now Nugget has some hearts to wear or grow into.


giveaways