Facebook

Facebook
Follow on Facebook

Follow on Pinterest

About Me

My photo
Believer, Daughter, Wife, Mother, Sister, Aunt, Registered Nurse, Seamstress, Crafter, Housekeeper, Cook, Baker, Gardener, Reader, Keeper of the chickens, Goat Herder, Homesteader, Thrifty, Usually sane, Overworked, Mom of 3. Thanks for stopping by - I appreciate your comments! ~ Angie

Pinterest

Followers

Monday, October 25, 2010

Mario Costume DONE


My big boy wants to be Mario for Halloween this year, so for $2 this is what I came up with...

The hat was self-drafted and is a little obnoxious, but I think it's pretty close to the picture above.  Close enough for a 9 year-old, anyhow.  The overalls were $2 at the thrift shop and the felt I had in my stash. They have a Mickey Mouse embroidered where the 'M' patch is now.   Now I just need a moustache and he's set!
Would anyone be interested in a Mario hat pattern & tutorial?  How is your costume sewing coming along?  Now I have 3 Prairie Girl dresses, aprons & bonnets to make...

FREE Wall or Desk Photo Calendar

Thank you, Today's Giveaway, for sharing about Vista Print's new promotion for a free personalized photo calendar. Buyer only pays for the shipping ~ my shipping quote was less than $6, so this is much cheaper than other photo calendars I have ordered before.  These make great Christmas gifts!  Your first calendar is free and the second starts at $15.00.  I'm headed to Vista Print to make mine...
Photo from Vista Print

Saturday, October 23, 2010

Remembering Joe Rodewald

A former student, player and friend was killed in Afghanistan last Wednesday while serving as a Marine.  Andy made a quick trip over to Albany for Joe Rodewald's memorial service.  My dear hubby, Andy, speaks briefly about Joe in this news clip.  Joe, you will be missed! Thank you for your sacrifice.

Thursday, October 21, 2010

Sewing/Utility Room Preview

I haven't had much extra time for sewing the last few months, but the garden is finally done and I've made good progress on the new sewing/utility room.  When we started the addition I was picturing a  big utility or "Mud Room" like we had in our farm house but the hubby had other ideas.  It ended up being more of a "Domestic Heaven" with a second range top for canning, full set of free kitchen cabinets, big pantry, overhead storage around the whole room and a sewing station. 


I've been busy painting the room & cabinets, cleaning & lining the shelves and drawers and moving my canned foods to the pantry shelves. 

Last week I made and hung curtains and plan to hang panels over the pantry and valances along the ceiling storage shelves.  

We had some unexpected dental bills and auto repairs so our budget for the Mud Room has been spent.  Thankfully, we had found the range top and light fixtures at the Habitat ReStore for $25 total and the cabinets were free from a local home remodel.  It's just been paint and sweat recently!  I even repainted the handles with epoxy paint instead of spending $100+ on new hardware.  Someday I'll get new but for now, these work.


I still need to clean and epoxy paint the floors and counter top and hang the rest of the curtains.  Andy needs to install my big utility sink and move the freezer along this blank wall and finish wiring the stove plug.  The end is in sight!

Tuesday, October 19, 2010

Benefit Sale Today Only

Little Lizard King is hosting a benefit sale today only for the Juvenile Diabetes Research Foundation.  Also, buy 2, get 1 free!

SALE!!!! Support Juvenile Diabetes Research Foundation! Today, all patterns are buy two get one free, and all proceeds go to JDRF. Purchase two patterns (not 3) of equal or greater value than the free pattern, and leave a note to seller in the checkout process indicating which pattern you want free. Thank you so much!

Stay tuned for the latest news and sales at littlelizardking.blogspot.com

Monday, October 18, 2010

Sneak Peek ~ DMK Junior Jeggings

Karen at Dear My Kids is at it again...another fun pattern for big girls, Jeggings for Juniors.  The little girls version is available now in the DMK Etsy shop.
These skinny pants have a funky back yoke and jeans-style pockets.  Love them!


Check the DMK Easy wear shop soon for the new Junior Jeggings pattern release.  I'm also looking forward to the Little Red Riding Hood coat and the Casual Long Hoodie for women from her Women's wear shop!

Has anybody figured out how to rotate photos with the new Blogger upload?

Thursday, October 7, 2010

Mama's Snakeskin Sling Bag

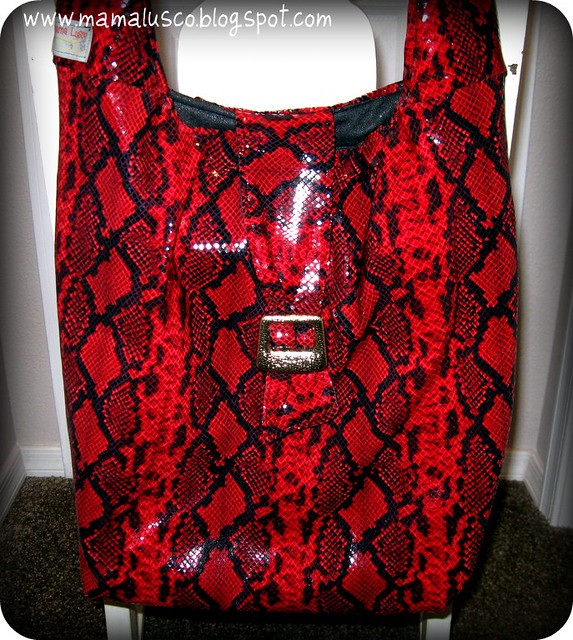
Lemon Squeezy Home is hosting Purse Week.  I had intended to make two bags but have only finished one...The Snakeskin Sling Bag.

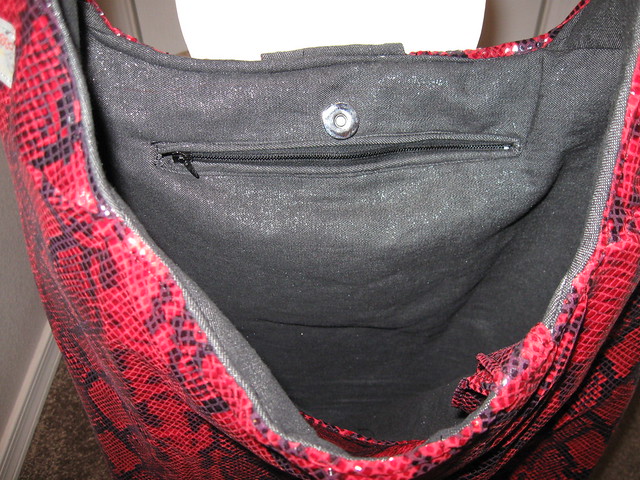
This is an original Mama Lusco Handmade design, a big sling bag that measures 16"w x 18"h x 5"d - lots of room for my planner, wallet, books, sippy cup and snacks!  I also included  a zippered pocket, phone pocket, key ring, magnetic snap and decorative flap closure.  I tried to write down my measurements as I cut so I can reproduce this pattern again.   

The outer fabric was a remnant from my talented friend, Jill Williamson,'s collection from her fashion design days.  Red is my favorite color and I just couldn't resist this flashy red spandex.  I tried iron-on interfacing but it ruined the shiny treatment, so I chose a beefy lining - stretch black denim with fusible fleece interfacing.  The bag has great shape and I'm thrilled with the results. 

Check out the other beautiful, inspirational bags in the Purse Week Flickr pool.  Entries accepted through Oct 8.

Wednesday, October 6, 2010

Mama Stellato Hoodie ~ Pattern Testing


Mally has another new hoodie! This one was compliments of Mama Stellato and is a soon-to-be released knit hoodie with fun criss-cross front bodice.  The pattern is beautifully constructed and the instructions are very clear.  It was a quick sew - 3 hours from printing to finished hoodie. The grey is a light t-shirt knit and the red trim was from my recycle stash.  I added a simple pom-pom pin and Mally loves it! 

Photo from Mama Stellato blog
I recently found Rachel's blog and answered her call for pattern testers.  I also own her Amelia top and am looking forward to using this one through the seasons.  Mama Stellato offers girls patterns in sizes 6mo - 5t.  Her patterns are affordable ($6 each), fun & classy.  Right now Rachel is offering a 2 for $10 sale in her Etsy shop.  Head on over, take a look and be watching for her hoodie pattern coming soon!

On another note, is anyone else having trouble with Blogger not keeping your photos rotated?  This started for me on Sunday and would love to hear how to fix it!  Advice is much appreciated!

Friday, October 1, 2010

Simply Spray Fabric Paint Review & Tutorials

I was thrilled to receive a sample package of Simply Spray Fabric Paints to review.  For this tutorial, I'm using the Simply Spray Party Kit and one can of Paint It Black spray paint.  (See post below for my review of the Spray Blood paint.)  Simply Spray claims they are "The ONLY non-toxic, non-flammable aerosol fabric paints!'
The Simply Spray Party Kit makes over 24 shirts!

Great for party favors!
Just twist, scrunch or fold your shirt and Simply Spray!

The Party Kit contains:
1 can Poppy Red
1 can Blue Jay
1 can Brite Orange
1 can Brite Yellow
1 can Spring Green
1 can Deep Purple


They recommend protecting your work surfaces.  We used Simply Spray outdoors on the grass or hanging from the clothes line.  I was impressed that there was NO odor and the paints washed off of our skin easily with soap and water. 

For my review, a friend and our 3 daughters tie-dyed 5 shirts, 4 pairs of socks and a pillow case.  For starters, I found an older, dingy white t-shirt and hung it on a hanger outdoors.  Using the Spring Green spray paint, I sprayed a light coat over the entire shirt, front & back.  The results gave a nice, soft varigated green finish.  She loves it!
For the pillowcase, I found a vintage case and a plastic flower stencil from my stash.  Place cardboard or plastic inside the pillowcase to prevent bleeding from front/back.  I simply laid the stencil on the fabric and sprayed Simply Spray around the stencil. 
As you can see, I had bleeding through the stencil so my flowers look more like blobs.  I would recommend using iron-on stencils, such as vinyl or freezer-paper, to get crisp results.  I possibly sprayed the paint too heavily, so multiple light layers of paint would likely work better than one heavy layer.  Let fabric dry before turning and painting the back side.  This took about 1 hour of drying time. 
We also painted tank tops and socks.  This was fun!  One tank was painted using the stencil method above, then free-hand by my daughter.  Start spraying to the side of the fabric, then move the paint onto your shirt to prevent splattering.  Yes, that's a heart on her rear :-)
 
The other tanks and socks were tie-tied.  We randomly wrapped rubber bands around each sock.  For the shirt, I gathered a small amount of fabric then wrapped it with a rubber band and repeated this about 6 times in various places. (I forgot to take a picture of the shirt with bands.)
Randomly spray with Simply Spray paints, turn and repeat.  We sprayed heavily, so the drying time on our fabrics was about 12 hours.  The socks on Abby above were finished after the first application. 

To add extra depth, I re-banded another pair of socks and the tank, hung it on the clothes line, then sprayed with the Paint It Black.

Love these results!  I have done traditional tie-dye and admit this is so much cleaner and easier than mixing dyes and soaking fabrics. 

I highly recommend Simply Spray fabric paints.  We painted heavily for bold, vivid colors and ended with about 10 painted items, not 24 as the box states.  The finish is soft and comfortable to wear.  Simply Spray is non-toxic so I feel safe letting my kids paint with it and wear it.  You can find retailers that sell Simply Spray HERE.  Their website also offers and inspirational design gallery , how-to videos, and project sheets.  I had emailed a question and received a helpful reply within 12 hours. 

I love this Camo Tie-dyed shirt from their Project Sheets,
Team Spirit project sheet,
and Sofa Update video.


Simply Spray is made in the USA and safe for the environment.  Check them out for yourself!

Spray Blood Tank & Mini-Tutorial

I was lucky to receive a sample of Simply Spray's Spray Blood.  This product delivered as promised!  It's designed to imitate blood splatter, bullet holes or dripping blood.  Best of all, it washes off of your skin with soap & water and is also washable on fabrics. 

To test this product, I used a white mens' tank top and one can of Spray Blood.  Items to be sprayed should be hung vertically to get the dripping effect, so I hung mine with clothes pins outdoors on my clothes line.  Place a piece of cardboard or plastic between the front and back of your shirt to prevent staining from front / back sides.  (Blogger is not keeping my photos rotated...ARGGGHH!!)
On the front, I followed their directions to make bullet holes:
BULLET HOLE EFFECT:

Costume position should be vertical. Hold can steady.
Spray blood in one spot and allow to drip, then release trigger.

For the back, I followed directions for the dripping blood:
DRIPPING BLOOD EFFECT:

Costume position should be vertical.
Spray blood slowly in a straight line, allowing blood to drip.

My thoughts on using Spray Blood:
- Product has a watery consistency much like real blood.  It drips on your trigger finger, so keep a wet rag near by to wipe off skin promptly and prevent skin staining.  
- No fumes or bad odors.
- No overspray but they recommend protecting your work surfaces if used indoors. 

The effect of Spray Blood truly looks like real blood!  My son had fun acting in his bloody tank and was really excited with how it turned out.  If you're looking for fake blood, this is a great product for fabrics!